---
title: Conversion tracking
description: In this article, we’ll explain how to track conversions for your campaign in Gleanin by adding our conversion tracking script to your event marketing pages and chosen conversion page.
---
[Skip to content](https://resources.gleanin.com/knowledge/conversiontracking#main-content)
[](https://gleanin.com/)
Open main navigation
Close main navigation
Welcome to the Gleanin help centre, search for an answer or navigate via the sections below
- There are no suggestions because the search field is empty.
1. [Help Center](https://resources.gleanin.com/knowledge?hsLang=en)
2. [Gleanin Classic](https://resources.gleanin.com/knowledge/gleanin-classic?hsLang=en)
3. [Running your campaign](https://resources.gleanin.com/knowledge/gleanin-classic?hsLang=en#running-your-campaign)
# Conversion tracking
## In this article, we’ll explain how to track conversions for your campaign in Gleanin by adding our conversion tracking script to your event marketing pages and chosen conversion page.
**[Conversion tracking setup (standard HTML)](https://resources.gleanin.com/knowledge/conversiontracking#without-GTM)**
**[Conversion tracking using Google Tag Manager](https://resources.gleanin.com/knowledge/conversiontracking#with-gtm)**
**[Conversion tracking on Cvent pages](https://resources.gleanin.com/knowledge/conversiontracking#cvent)**
**[Conversion tracking on Visit by GES pages](https://resources.gleanin.com/knowledge/conversiontracking#visit)**
**[Conversion tracking on Swoogo pages](https://resources.gleanin.com/knowledge/conversiontracking#swoogo)**
**[Conversion tracking on Pheedloop pages](https://resources.gleanin.com/knowledge/conversiontracking#pheedloop)**
**[Conversion tracking using UTM parameters](https://resources.gleanin.com/knowledge/conversiontracking#utm)**
**[Tracking URL builder](https://resources.gleanin.com/knowledge/conversiontracking#builder)**
[**Troubleshooting and help**](https://resources.gleanin.com/knowledge/conversiontracking#help)
### **Conversion tracking setup**
To use conversion tracking, you will need to generate a conversion tracking script that needs to be added to your event pages. These instructions apply to the general HTML setup. If you are using Cvent, Visit by GES, Pheedloop, or Swoogo, please refer to the specific instructions provided for those platforms above.
**Web tracking code**
To access the first part of the conversion tracking code, you need to follow the steps below:
1. Log in to your Gleanin account and navigate to the event for which you want to set up tracking.
2. Choose the **Conversion tracking** section from the left-hand side menu.
3. Click on the **Web page tracking** section to expand the menu.
4. Under **Marketing page provider** and **Registration page provider**, select the **HTML web page** option; if your registration pages are not on the standard HTML webpage, please choose from the provider-specific instructions above.
5. You will now need to have this code **added on all the event pages** - marketing, registration and confirmation page - and you will need to send this to whoever is your website and registration page provider and ask them to add the snippet of the code to those pages.
6. If you are using GTM, please scroll down to the next section of this article.
**Confirmation page code**
Once the web tracking code is implemented, you will need to follow the steps below:
1. Go back to the **Conversion tracking** section.
2. Click on the **Confirmation page tracking** section to expand the menu.
3. From the **Custom code option,** select the **HTML web page** - if you are a Pro subscriber, you can choose to add [advanced reporting](https://resources.gleanin.com/knowledge/advanced-reporting-2?hsLang=en) to the code.
4. Ask your confirmation page provider to **add this code to the body section of the page.**
5. If you are using GTM, please scroll down to the next section of this article.
Once both parts of the code have been implemented correctly, you will be able to see successful conversions in the dashboard.
***Note:** This code is only for conversion tracking, and if you want to embed the Gleanin advocacy tool, you will need to follow the steps [here](https://resources.gleanin.com/knowledge/adding-share-tool-to-your-confirmation-page?hsLang=en).*
### **Conversion tracking using Google Tag Manager**
Google Tag Manager (GTM) streamlines the code implementation process, allowing you to add the snippets via a tag within a container instead of having to add them to each individual page.
**Web tracking code**
To access the first part of the conversion tracking code, you need to follow the steps below:
1. Log in to your Gleanin account and navigate to the event for which you want to set up tracking.
2. Choose the **Conversion tracking** section from the left-hand side menu.
3. Click on the **Web page tracking** section to expand the menu.
4. Under **Marketing page provider** and **Registration page provider**, select the **HTML web page** **(standard)** option; if your registration pages are not on the standard HTML webpage, please choose from the provider-specific instructions above.
5. Go to **Google Tag Manager** and find a container that is present on all of the event pages.
6. **Create a new tag** within that container, naming it “Gleanin tracking code YEAR.” To make future edits easier, we suggest using the event year or season, such as 2025 or Spring 2026, as part of the tag name. Set the tag type to **Custom HTML**.
7. **Paste the snippet of the code** generated in the Web tracking code section in your Gleanin account into the **HTML box**.
8. Find **an existing** trigger or create **a new one** that will fire **on all pages** and apply it to the tag.
9. **Save** all changes.
**Confirmation page code**
Once the web tracking code is implemented, you will need to follow the steps below:
1. Go back to the **Conversion tracking** section.
2. Click on the **Confirmation page tracking** section to expand the menu.
3. From the **Custom code option,** select **HTML web page** - if you are a Pro subscriber, you can choose to add [advanced reporting](https://resources.gleanin.com/knowledge/advanced-reporting-2?hsLang=en) to the code.
4. Go to **Google Tag Manager** and find a container used for this event.
5. **Create a new tag** within that container, naming it “Gleanin confirmation page code YEAR.” As with the web tracking one, we suggest using the event year or season, such as 2025 or Spring 2026, as part of the tag name. Set the tag type to **Custom HTML**.
6. **Paste the snippet of the code** generated in the Confirmation page tracking section in your Gleanin account into the **HTML box**.
7. Find **an existing** trigger or create **a new one** that will fire **only on the confirmation page** (in the example below, we have a page path containing thank-you, but it might be a different one in your case, as long as it is a confirmation page only) and apply it to the tag.
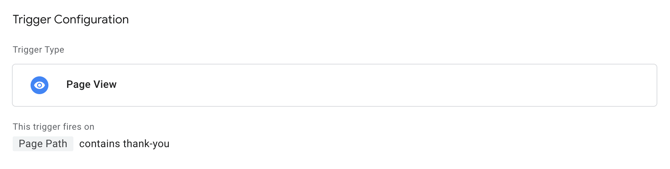
8. **Save** all the changes.
9. If you are a Pro subscriber and want to use advanced reporting, please check this article.
Once both parts of the code have been implemented correctly, you will be able to see successful conversions in the dashboard.
Please note that tags can be reused, which simplifies the process for future events. If your event is held annually, you can simply access the existing tags from the previous year, update their names, and modify the HTML snippets as needed instead of creating completely new tags. Make sure that your event has ended before making any edits.
Please watch the video below for a detailed overview of the entire implementation process.
***Note:** This code is only for conversion tracking, and if you want to embed the Gleanin advocacy tool, you will need to follow the steps [here](https://resources.gleanin.com/knowledge/adding-share-tool-to-your-confirmation-page?hsLang=en).*
### **Conversion tracking on Cvent pages**
If you are using Cvent for your registration pages, you can implement conversion tracking by creating a custom code snippet within your Cvent account. Please note that the instructions provided below will apply only to the Cvent pages.
**Web tracking code**
To access the first part of the conversion tracking code, you need to follow the steps below:
1. Log in to your Gleanin account and navigate to the event for which you want to set up tracking.
2. Choose the **Conversion tracking** section from the left-hand side menu.
3. Click on the **Web page tracking** section to expand the menu.
4. Under **Marketing page provider** and **Registration page provider**, select the **Cvent** option; if your marketing pages are not on Cvent, please see the HTML standard section on how to implement the web tracking code for standard pages.
5. Copy the code generated and log in to your Cvent account.
6. Go to your **Admin pane**l and from the left-hand side menu, choose **Code snippets** and click on **Create code snippet**.
7. Fill in the following details:
1. **Name** - Gleanin UTM store
2. **Code** - GLEANIN\_UTM\_STORE
3. **Type** - Approved
4. **Allow website visitors to turn off code snippet** - No, use snippet for everyone on event websites
5. **Code snippet** - paste the code generated in Gleanin
6. **Save**
Please note that this code will now be available for all of your Cvent account events, so this is a one-off setup.
8. Go to the **Event** in question and, from the left-hand side menu, click on **Marketing** and then **Code snippets**
9. Click on **Add code snippet,** and on the next screen click on the three dots icon and select the **Gleanin UTM store**.
10. Under Snippet type, select **All website and registration pages** and Save.
**Confirmation page code**
Once the web tracking code is implemented, you will need to follow the steps below:
1. Go back to the **Conversion tracking** section.
2. Click on the **Confirmation page tracking** section to expand the menu.
3. From the **Custom code option,** select **Cvent.** If you are a Pro subscriber, you can choose to add [advanced reporting](https://resources.gleanin.com/knowledge/advanced-reporting-2?hsLang=en) to the code.
4. Go to the **Website & Registration** tab and select **Registration Process**
5. Click the **Customise** button for the confirmation page
6. Under **Page Elements,** select **Code** and drag it to where you want Gleanin to appear on the page
1. NB. If you don't see **Code** under **Page Elements,** you will need to ask Cvent to switch this feature on for you
7. Paste the Gleanin code into the space
8. Click **Apply Changes** and then **Save**
Please watch the video below for a detailed overview of the entire implementation process.
***Note:** This code is only for conversion tracking, and if you want to embed the Gleanin advocacy tool, you will need to follow the steps [here](https://resources.gleanin.com/knowledge/adding-share-tool-to-your-confirmation-page?hsLang=en).*
### **Conversion tracking on Visit by GES pages**
If you are using Visit by GES (N200) for your registration pages, you can implement conversion tracking by creating a custom code snippet within your Visit account. Please note that the instructions provided below will apply only to the Visit pages. For any additional event pages that you have created, you will need to integrate the web tracking code according to the standard setup outlined in the first section.
**Web tracking code**
To access the first part of the conversion tracking code, you need to follow the steps below:
1. Log in to your Gleanin account and navigate to the event for which you want to set up tracking.
2. Choose the **Conversion tracking** section from the left-hand side menu.
3. Click on the **Web page tracking** section to expand the menu.
4. Under **Marketing page provider** and **Registration page provider** - select the **Visit** option; if your marketing pages are not on Visit, please see the HTML standard section on how to implement the web tracking code for standard pages.
5. Log in to your **Visit** account and go to the event in question.
6. From the left-hand side menu, click on **Form and choose Scripts**
7. Click on the **Event script** tab and paste the snippet of code generated in your Gleanin account into the code box. This code will be added across all of the event forms and pages.
8. Click on **Save**.
**Confirmation page code**
Once the web tracking code is implemented, you will need to follow the below:
1. Go back to the **Conversion tracking** section.
2. Click on the **Confirmation page tracking** section to expand the menu.
3. From the **Custom code option** select **Visit** - if you are a Pro subscriber you can choose to add [advanced reporting](https://resources.gleanin.com/knowledge/advanced-reporting-2?hsLang=en) to the code.
4. Log in to your **Visit** account and go to the event in question.
5. Go to the **Forms section** in the left-hand menu and select the relevant form
6. Make sure you select the **Complete** page and are on the **Current Page** Settings (unlike the web tracking code, this one **must be** on the confirmation page only )

7. Click in**Edit JavaScript**
8. **Paste** the code from Gleanin into the box and then **save** your changes.
Please watch the video below for a detailed overview of the entire implementation process.
***Note:** This code is only for conversion tracking, and if you want to embed the Gleanin advocacy tool, you will need to follow the steps [here](https://resources.gleanin.com/knowledge/adding-share-tool-to-your-confirmation-page?hsLang=en).*
### **Conversion tracking on Swoogo pages**
If you are using Swoogo for your registration pages, you can implement conversion tracking by creating a custom code snippet within your Swoogo account. Please note that the instructions provided below will apply only to the Swoogo pages. For any additional event pages that you have created, you will need to integrate the web tracking code according to the standard setup outlined in the first section.
**Web tracking code**
To access the first part of the conversion tracking code, you need to follow the steps below:
1. Log in to your Gleanin account and navigate to the event for which you want to set up tracking.
2. Choose the **Conversion tracking** section from the left-hand side menu.
3. Click on the **Web page tracking** section to expand the menu.
4. Under **Marketing page provider** and **Registration page provider** - select the **HTML web page (standard)** option.
5. Copy the code generated and log in to your **Swoogo** account.
6. Go to your **Account hub** and go to **Themes & Assets** from the left-hand side menu, and choose **JavaScript** **Snippets** and click on **Add snippet**.
7. Add in the following details:
1. **Name** - Gleanin UTM store
2. **Code** - paste the snippet of code generated in Gleanin
3. **Code Position** - Foot of page
4. **Save**
8. Go to the Event where you want this snippet to be used.
9. Click on **Website** and under **Tools & Analytics,** click on **JavaScript Snippets**
10. If the snippet has been added correctly on the account level, you will see it listed on the page, and under **Include On,** select **All Pages;** if you cannot see the snippet, use the search bar to find it.
11. Click **Save**
**Confirmation page code**
Once the web tracking code is implemented, you will need to follow the below:
1. Go back to the **Conversion tracking** section.
2. Click on the **Confirmation page tracking** section to expand the menu.
3. From the **Custom code option,** select **HTML web page (standard)** - if you are a Pro subscriber, you can choose to add [advanced reporting](https://resources.gleanin.com/knowledge/advanced-reporting-2?hsLang=en) to the code.
4. Log in to your **Swoogo** account and go to the event in question.
5. Choose Website from the left-hand side menu.
6. Go to **Pages**, select the **Registration** tab and click on the edit icon next to the **Confirmation** page

7. Scroll down to the **Custom Code Settings** section and paste the Gleanin code into the **Custom Code** box.
8. Set the **Code Position** to**Foot of the page.**
9. **Save** the changes.
Please watch the video below for a detailed overview of the entire implementation process.
***Note:** This code is only for conversion tracking, and if you want to embed the Gleanin advocacy tool, you will need to follow the steps [here](https://resources.gleanin.com/knowledge/adding-share-tool-to-your-confirmation-page?hsLang=en).*
### **Conversion tracking on Pheedloop pages**
If you are using Pheedloop for your registration pages, you can implement conversion tracking by adding a custom code snippet to your Pheedloop pages. Please note that the instructions provided below will apply only to the Pheedloop pages. For any additional event pages that you have created, you will need to integrate the web tracking code according to the standard setup outlined in the first section.
**Web tracking code**
To access the first part of the conversion tracking code, you need to follow the steps below:
1. Log in to your Gleanin account and navigate to the event for which you want to set up tracking.
2. Choose the **Conversion tracking** section from the left-hand side menu.
3. Click on the **Web page tracking** section to expand the menu.
4. Under **Marketing page provider** and **Registration page provider** - select the **Pheedloop** option; if your marketing pages are not on Cvent, please see the HTML standard section on how to implement the web tracking code for standard pages.
5. Copy the code generated and log in to your Pheedloop account.
6. Go to the Event Website and click on Settings.
7. Click on Custom code and paste the code generated in Gleanin.
**Confirmation page code**
Once the web tracking code is implemented, you will need to follow the below:
1. Go back to the **Conversion tracking** section.
2. Click on the **Confirmation page tracking** section to expand the menu.
3. From the **Custom code option,** select **Pheedloop** - if you are a Pro subscriber, you can choose to add [advanced reporting](https://resources.gleanin.com/knowledge/advanced-reporting-2?hsLang=en) to the code.
4. Go to the Event Website and click on Settings.
5. Click on Custom code and paste the code generated in Gleanin.
***Note:** This code is only for conversion tracking, and if you want to embed the Gleanin advocacy tool, you will need to follow the steps [here](https://resources.gleanin.com/knowledge/adding-share-tool-to-your-confirmation-page?hsLang=en).*
### **Conversion tracking using UTM parameters**
UTM parameters are URL parameters used to track the effectiveness of online marketing campaigns. They identify the campaign that refers traffic to a specific website and can be parsed by analytics tools to populate reports.
There are many different UTM parameters which can be used; however, the most commonly used in Gleanin are the main 3 below:
- utm\_source - identifies which site sent the traffic, and is a required parameter
- utm\_medium - identifies what type of link was used
- utm\_campaign - identifies a specific product promotion or strategic campaign
To track the conversion on your side, you will need to add the URL parameters and make sure that your Google Analytics setup is correct. Please see [the article here](https://support.google.com/analytics/answer/12966437?hl=en) for more information.
Here is an example of an attendee campaign destination URL that can be used in Gleanin:
**https://www.test.com/regsitration-page?*utm\_source=gleanin*&*utm\_medium=gleanin-speaker***
**&*utm\_campaign=******gleanin-11111***
It is highly recommended to set up both the Gleanin conversion script and UTM parameters for your campaign in order to ensure that no conversions are missed. From our experience, we have found that occasionally our conversion tracking may underestimate the results when compared to UTM tracking. Therefore, using both methods will provide a more accurate and comprehensive view of your campaign's performance.
### **Tracking URL Builder**
With the tracking URL builder, you have the ability to add new or verify the current UTM parameters for your landing page URL.
**To add UTM parameters to your URL:**
1. Navigate to your **campaign dashboard**
2. Click on the **Edit** button on the **Landing page URL** tile
3. You have the option to either:
1. **accept our recommended settings** in the URL health check box on the right-hand side or
2. click on **Show builder** to add and customise the parameters yourself
4. After making your changes, don't forget to click on **Save**.
You can always include additional custom UTM parameters by clicking on "Add additional custom UTM code" and adding them into the designated fields.
**To review the existing UTM parameters on your landing page URL:**
1. Navigate to your **campaign dashboard**
2. Click on the **Edit** button on the **Landing page URL** tile
3. Once you **input** your **landing page URL** in the specified box, you will see the URL health checker on the right-hand side:
1. if everything looks correct, the check box will turn green
2. if adjustments are necessary, the box will turn yellow and offer recommendations for updating your URL
4. If you have made any changes or accepted recommendations, don't forget to click on **Save changes**.
Please note that you have the flexibility to make adjustments based on the recommendations or keep your original URL as is.
PRO subscribers have the option to create a customised destination URL for each of their speakers or exhibitors. By adding UTM parameters to these URLs, you can track conversions specifically from each individual stakeholder.
### **Troubleshooting and help**
If you have followed all the necessary steps and ensured that the added code matches exactly what was generated on the platform, and if you have included all components of the code but are still encountering issues, or if you have questions before doing any of this, please feel free to contact us at hello@gleanin.com or book a conversion tracking setup call [here](https://meetings.hubspot.com/michal-halasa/conversion-tracking-setup).
If you have implemented the code and want us to test it, we will need to inspect all of the pages to verify the code, which typically requires going through the registration flow. For free registrations, we will proceed through the flow; however, a discount code for paid registrations will be necessary.
- [Gleanin](https://resources.gleanin.com/knowledge/gleanin?hsLang=en#main-content)
- [Asset hub](https://resources.gleanin.com/knowledge/gleanin?hsLang=en#asset-hub)
- [Attendee campaign](https://resources.gleanin.com/knowledge/gleanin?hsLang=en#attendee-campaign)
- [Asset creation](https://resources.gleanin.com/knowledge/gleanin?hsLang=en#asset-creation)
- [Upload and data](https://resources.gleanin.com/knowledge/gleanin?hsLang=en#upload-and-data)
- [Reporting](https://resources.gleanin.com/knowledge/gleanin?hsLang=en#reporting)
- [Advanced features](https://resources.gleanin.com/knowledge/gleanin?hsLang=en#advanced-features)
- [Gleanin Classic](https://resources.gleanin.com/knowledge/gleanin-classic?hsLang=en#main-content)
- [Managing your account](https://resources.gleanin.com/knowledge/gleanin-classic?hsLang=en#managing-your-account)
- [Running your campaign](https://resources.gleanin.com/knowledge/gleanin-classic?hsLang=en#running-your-campaign)
- [Upload and data](https://resources.gleanin.com/knowledge/gleanin-classic?hsLang=en#upload-and-data)
- [Asset creation](https://resources.gleanin.com/knowledge/gleanin-classic?hsLang=en#asset-creation)
- [Reporting](https://resources.gleanin.com/knowledge/gleanin-classic?hsLang=en#reporting)
- [Advanced features](https://resources.gleanin.com/knowledge/gleanin-classic?hsLang=en#advanced-features)
- [Tutorials](https://resources.gleanin.com/knowledge/gleanin-classic?hsLang=en#tutorials)
- [Data integrations](https://resources.gleanin.com/knowledge/data-integrations?hsLang=en)
- [Common questions](https://resources.gleanin.com/knowledge/common-questions?hsLang=en)
- [Best practice](https://resources.gleanin.com/knowledge/best-practice?hsLang=en#main-content)
- [Gleanin Classic](https://resources.gleanin.com/knowledge/best-practice?hsLang=en#gleanin-classic)
- [Product updates](https://resources.gleanin.com/knowledge/product-updates?hsLang=en#main-content)
- [Gleanin Classic & legacy updates](https://resources.gleanin.com/knowledge/product-updates?hsLang=en#gleanin-classic-legacy-updates)
[](https://gleanin.com/)
Copyright © 2026 Gleanin
```json
{
"@context" : "https://schema.org",
"@type" : "VideoObject",
"contentUrl" : "https://stream.mux.com/NKhGVEaH7MzPqspNEPgYhecSe7gYUBElN2MSZHaIQvc/capped-1080p.mp4",
"dateModified" : "2025-04-11T07:52:27.090Z",
"duration" : "PT1M31S",
"height" : 720,
"name" : "GTM Conversion tracking",
"thumbnailUrl" : "https://7244067.fs1.hubspotusercontent-na1.net/hubfs/7244067/GTM%20Conversion%20tracking.mp4/medium.jpg",
"uploadDate" : "2025-04-11T07:52:27.085Z",
"width" : 1280
}
```
```json
{
"@context" : "https://schema.org",
"@type" : "VideoObject",
"contentUrl" : "https://stream.mux.com/hneyfZzP0174Qyi8uUqIVSvUTX01Ckr4PApkXTfXvy02sg/capped-1080p.mp4",
"dateModified" : "2025-04-11T07:46:43.696Z",
"duration" : "PT2M15S",
"height" : 720,
"name" : "Cvent tracking",
"thumbnailUrl" : "https://7244067.fs1.hubspotusercontent-na1.net/hubfs/7244067/Cvent%20tracking.mp4/medium.jpg",
"uploadDate" : "2025-04-11T07:46:43.691Z",
"width" : 1280
}
```
```json
{
"@context" : "https://schema.org",
"@type" : "VideoObject",
"contentUrl" : "https://stream.mux.com/AakRF201x9vS00g4cyxDdIfC00SjtBWGZxypVGYtdYjsDU/capped-1080p.mp4",
"dateModified" : "2025-04-11T07:47:18.825Z",
"duration" : "PT1M17S",
"height" : 720,
"name" : "Visit tracking",
"thumbnailUrl" : "https://7244067.fs1.hubspotusercontent-na1.net/hubfs/7244067/Visit%20tracking.mp4/medium.jpg",
"uploadDate" : "2025-04-11T07:47:18.819Z",
"width" : 1280
}
```
```json
{
"@context" : "https://schema.org",
"@type" : "VideoObject",
"contentUrl" : "https://stream.mux.com/2HcRxYR022gHzJ727tPCmVmiVKrMHcsyuRy3wFqHpJyU/capped-1080p.mp4",
"dateModified" : "2025-04-11T07:47:38.678Z",
"duration" : "PT1M40S",
"height" : 720,
"name" : "Swoogo tracking",
"thumbnailUrl" : "https://7244067.fs1.hubspotusercontent-na1.net/hubfs/7244067/Swoogo%20tracking.mp4/medium.jpg",
"uploadDate" : "2025-04-11T07:47:38.673Z",
"width" : 1280
}
```