Only the attendee campaign can be used with the share tool, as it contains no personal details and is the same for all registrants.
Standard HTML setup
Standard HTML setup with Google Tag Manager
Grip Events
Visit by GES:
Pop-up
Embed
Cvent
Pheedloop
Swoogo
Eventbrite:
Form registration
Embedded checkout
Registration pages without JavaScript or HTML embed
Troubleshooting & help
You can also send registrants a link to the advocacy tool, which you can use in your registration confirmation emails or any other communication with them in the run-up to the event.
Standard web page HTML setup
- Create your attendee campaign; a guide on that can be found here.
- Go to the Share tool in the left-hand menu and choose the setting below:
-
-
Display the Gleanin advocacy tool - choose between pop-up or embed;
-
Campaign to display - choose the campaign from the dropdown; please note that only attendee campaigns can be displayed as they are not personalised to an individual;
-
Pop-up delay - you can set a short delay before the pop-up appears;
-
Advanced reporting - only available on Pro subscription; more information on the feature can be found here;
-
Custom code options - select HTML web page (standard);
-
Click Generate code, and the code you need will appear on the right-hand side.
-
Please provide this code to your registration page provider or the registration team and request that they add it to the registration confirmation page. Make sure that the added code is exactly as generated on the platform and that all components of the code are included and it is implemented on the confirmation page only.
Any changes, typos, or omissions will cause the code to fail, and the share tool will not be displayed.
Please ensure that you have set up conversion tracking to effectively monitor conversions for your event.
Standard web page HTML setup using Google Tag Manager
- Create your attendee campaign; a guide on that can be found here.
- Go to the Share tool in the left-hand menu and choose the setting below:
-
-
Display the Gleanin advocacy tool - choose between pop-up or embed;
-
Campaign to display - choose the campaign from the dropdown; please note that only attendee campaigns can be displayed as they are not personalised to an individual;
-
Pop-up delay - you can set a short delay before the pop-up appears;
-
Advanced reporting - only available on Pro subscription; more information on the feature can be found here;
-
Custom code options - select HTML web page (standard);
-
Click Generate code, and the code you need will appear on the right-hand side. Copy this code.
-
-
- Go to the Google Tag Manager and find a container used for this event.
- Create a new tag within that container, naming it "Gleanin share tool". Set the tag type to Custom HTML.
- Paste the snippet of the code generated in the share tool section in your Gleanin account into the HTML box.
- Find an existing trigger or create a new one that will fire only on the confirmation page (in the example below, we have a page path containing thank-you, but it might be a different one in your case, as long as it is a confirmation page-only) and apply it to the tag.

- Save all the changes.
Make sure that the added code is exactly as generated on the platform and that all components of the code are included and it is implemented on the confirmation page only.
Any changes, typos, or omissions will cause the code to fail, and the share tool will not be displayed.
Please ensure that you have set up conversion tracking to effectively monitor conversions for your event.
Grip Events
To make the Gleanin share tool appear on your Grip Events registration confirmation page, you need to do the setup in your Grip account by providing the Event ID and Campaign ID which you can find in your Gleanin account.
.png?width=670&height=172&name=image%20(1).png)
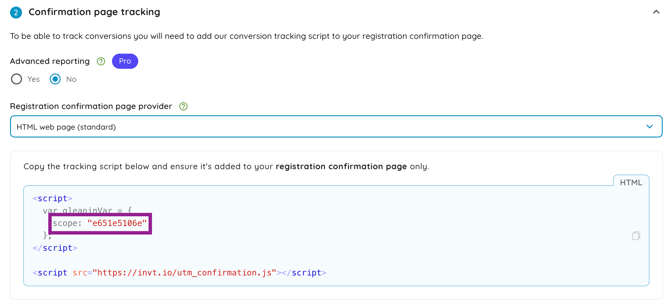
To obtain the Event ID from your Gleanin account, you need to follow these steps:
- Go to the Conversion tracking section on the left-hand side menu.
- Expand the Confirmation page tracking section and choose pop-up and HTML.
- You will find the Event ID in the code below. Please note that it is called "scope" in your Gleanin account.
To obtain the campaign ID from your Gleanin account, you need to follow these steps:
- Create your attendee campaign; a guide on that can be found here.
- Once created, you will find the campaign ID in the URL:

Add both of those IDs into the required field in your Grip account.
Please bear in mind that for the Grip events, following this setup will give you both the Share tool for you attendee campaign and the conversion tracking.
Visit by GES confirmation page share tool setup:
Implementing the share tool as a pop-up
- Create your attendee campaign; a guide on that can be found here.
- Go to the Share tool in the left-hand menu and choose the setting below:
-
-
Display the Gleanin advocacy tool - choose pop-up; for embed setup, see section below;
-
Campaign to display - choose the campaign from the dropdown; please note that only attendee campaigns can be displayed as they are not personalised to an individual;
-
Pop-up delay - you can set a short delay before the pop-up appears;
-
Advanced reporting - only available on Pro subscription; more information on the feature can be found here;
-
Custom code options - select Visit by GES;
-
Click Generate code, and the code you need will appear on the right-hand side. Copy this code.
-
-
- Log in to your Visit account and go to the event in question.
- Go to the Forms section in the left-hand menu and select the relevant form
- Make sure you select the Complete page and are on the Current Page Settings

- Click in Edit JavaScript
- Paste the code from Gleanin into the box and then save your changes.
Make sure that the added code is exactly as generated on the platform and that all components of the code are included and it is implemented on the confirmation page only.
Any changes, typos, or omissions will cause the code to fail, and the share tool will not be displayed.
Please ensure that you have set up conversion tracking to effectively monitor conversions for your event.
Embedding the share tool on the form
- Create your attendee campaign; a guide on that can be found here.
- Go to the Share tool in the left-hand menu and choose the setting below:
-
-
Display the Gleanin advocacy tool - choose embed; for pop-up setup, see section above;
-
Campaign to display - choose the campaign from the dropdown; please note that only attendee campaigns can be displayed as they are not personalised to an individual;
-
Pop-up delay - you can set a short delay before the pop-up appears;
-
Advanced reporting - only available on Pro subscription; more information on the feature can be found here;
-
Custom code options - select Visit by GES;
-
Click Generate code, and the code you need will appear on the right-hand side. You will see two separate parts of the code generated.
-
-
- Log in to your Visit account and go to the event in question.
- Go to the Forms section in the left-hand menu and select the relevant form
- Make sure you select the Complete page and are on the Current Page Settings

- Click in Edit JavaScript
- Paste the JS snippet of the code from Gleanin into the box.


- Click on Apply to save the code.
- Select the point on the page where you want to embed the referral tool and select Code View, and copy the HTML code from Gleanin and paste it into the box.


- Click the Code View icon to close the box and then save your changes
Make sure that the added code is exactly as generated on the platform and that all components of the code are included and it is implemented on the confirmation page only.
Any changes, typos, or omissions will cause the code to fail, and the share tool will not be displayed.
Please ensure that you have set up conversion tracking to effectively monitor conversions for your event.
Cvent confirmation page share tool setup
- Create your attendee campaign; a guide on that can be found here.
- Go to the Share tool in the left-hand menu and choose the setting below:
-
-
Display the Gleanin advocacy tool - choose embed setup; pop-up is not supported on Cvent pages;
-
Campaign to display - choose the campaign from the dropdown; please note that only attendee campaigns can be displayed as they are not personalised to an individual;
-
Advanced reporting - only available on Pro subscription; more information on the feature can be found here;
-
Custom code options - select Cvent;
-
Click Generate code, and the code you need will appear on the right-hand side. Copy this code.
-
-
- Log in to your Cvent account and go to the event in question.
- Go to the Website & Registration tab and select Registration Process
- Click the Customize button for the confirmation page
- Under Page Elements, select Code and drag it to where you want Gleanin to appear on the page
- NB. If you don't see Code under Page Elements you will need to ask Cvent to switch this feature on for you
- Paste the Gleanin code into the space
- Click Apply Changes and then Save
Make sure that the added code is exactly as generated on the platform and that all components of the code are included and it is implemented on the confirmation page only.
Any changes, typos, or omissions will cause the code to fail, and the share tool will not be displayed.
Please ensure that you have set up conversion tracking to effectively monitor conversions for your event.
Pheedloop confirmation page share tool setup
- Create your attendee campaign; a guide on that can be found here.
- Go to the Share tool in the left-hand menu and choose the setting below:
-
-
Display the Gleanin advocacy tool - choose pop-up setup; we have not been able to confirm the embed functionality on a Pheedloop form;
-
Campaign to display - choose the campaign from the dropdown; please note that only attendee campaigns can be displayed as they are not personalised to an individual;
-
Advanced reporting - only available on Pro subscription; more information on the feature can be found here;
-
Custom code options - select Pheedloop;
-
Click Generate code, and the code you need will appear on the right-hand side. Copy this code.
-
-
- Log in to your Pheedloop account and go to the event in question.
- Click on Settings
- Select Custom code and paste the code generated in your Gleanin account.
Make sure that the added code is exactly as generated on the platform and that all components of the code are included and it is implemented on the confirmation page only.
Any changes, typos, or omissions will cause the code to fail, and the share tool will not be displayed.
Please ensure that you have set up conversion tracking to effectively monitor conversions for your event.
Swoogo confirmation page share tool setup
- Create your attendee campaign; a guide on that can be found here.
- Go to the Share tool in the left-hand menu and choose the setting below:
-
-
Display the Gleanin advocacy tool - choose pop-up setup; Swoogo doesn't support an embed version of the tool.
-
Campaign to display - choose the campaign from the dropdown; please note that only attendee campaigns can be displayed as they are not personalised to an individual;
-
Advanced reporting - only available on Pro subscription; more information on the feature can be found here;
-
Custom code options - select HTML (web standard);
-
Click Generate code, and the code you need will appear on the right-hand side. Copy this code.
-
-
- Log in to your Swoogo account and go to the event in question.
- Choose Website from the left-hand side menu.
- Go to Pages, select the Registration tab and click on edit icon next to the Confirmation page

- Scroll down to the Custom Code Settings section and paste the Gleanin code into the Custom Code box.
- Set the Code Position to Foot of the page - if this is not selected, the share tool will fail.
Make sure that the added code is exactly as generated on the platform and that all components of the code are included and it is implemented on the confirmation page only.
Any changes, typos, or omissions will cause the code to fail, and the share tool will not be displayed.
Please ensure that you have set up conversion tracking to effectively monitor conversions for your event.
Eventbrite share tool setup
Adding Gleanin to an Eventbrite Form Registration
If you're using an Eventbrite form (not their embedded checkout), you can add Gleanin to the end of your registration flow by automatically redirecting people to a different page when they complete registration.
Redirecting to Gleanin When an Eventbrite Form is Completed
To show Gleanin to registrants once they complete registration, we are going to add a redirect link in Eventbrite. The redirect can go to one of two places:
- Directly to the Gleanin share tool.
- To one of your landing pages that has the Gleanin pop-up or embed added in the normal way.
To see what the user experience is like, you can register for our pretend event on this form. When you complete registration, you will be redirected to a separate “thank you” webpage with the Gleanin pop-up added in the normal way.
The steps for adding the redirect URL to your Eventbrite registration are:
- Have your URL ready - either a “Sendable link” to an attendee campaign (select your campaign, then “How to run my campaign”), or a link to a webpage you have added Gleanin to.
- Log in to your Eventbrite account
- Select “Manage my events”
- Select your event.
- Select “Order options” > “Order confirmation”.
- Under “Customise Webpage” find the “Message For Order Confirmation Page (No Html Tags Allowed)”
- Enter only the URL in this box
- Scroll to the bottom and “Save Settings”
Once you’ve done that, we’d recommend you register for your event and test that you’re happy with the flow.
Adding Gleanin to an Eventbrite Embedded Checkout
If you're using Eventbrite’s embedded checkout on your website and want to display Gleanin when registration is completed, you can either redirect to a different page or trigger the Gleanin pop-up. To achieve both of these, we will be using the callback function supported by Eventbrite.
Before trying to introduce Gleanin, first add the Eventbrite embed code to your site and ensure it is working. You can see how in Eventbrite’s guide and troubleshooting steps.
We'll cover both methods of using Gleanin with your Eventbrite Embedded Checkout, but it's important to understand the Eventbrite embed code in a little more detail before you get started.
Understanding the Eventbrite Embed Code
Both redirecting and triggering the Gleanin pop-up utilize a feature supported by Hubspot’s embed code called a “callback function”; A callback function is a bit of code you supply, which Hubspot will run when a registration is completed. The code Hubspot provides to add their Embedded Checkout already includes a placeholder for this function. In the image below, the callback function is in the red box, and the name of the function is underlined in two places: where it is defined and where it is used. The placeholder callback function logs a message saying “Order complete”.

The Eventbrite code to embed their checkout code .
The following steps involve editing the Javascript code shown above. While we hope the changes are clear you may want to get a technical teammate's help
Redirecting when an Eventbrite Embedded Checkout is completed
Once you have the embedded checkout working you can add the redirect. The code example below shows the change that you need to make to the example callback function you got from Hubspot. The code below will take the user to example.com; you must change the URL. The URL can either point to a “thank you” page with Gleanin added as normal or it can point directly to the Gleanin “Sendable link” for an attendee campaign. The “500” in the code below is the number of milliseconds to wait before redirecting the user. If you want to redirect immediately on completion, set it to zero.
var exampleCallback = function() {
  console.log('Order complete!');
  setTimeout(function () {
    window.location.assign("https://example.com");
  }, 500);
};
Once you have completed the edit above register for your event using the embedded checkout and confirm the redirect is working as you want.
Triggering the Gleanin Pop-up When an Eventbrite Embedded Checkout is Completed
First, get the Eventbrite embedded checkout working without adding Gleanin. Once that is working, follow the steps below to add the Gleanin pop-up.
The code required to trigger the Gleanin pop-up is more complex than for the redirect - we are going to add a custom callback function to your Eventbrite embed code and use that to insert the Gleanin pop-up on your page.
- Create your attendee campaign; a guide on that can be found here.
- Go to the Share tool in the left-hand menu and choose the setting below:
-
-
Display the Gleanin advocacy tool - choose pop-up setup;
-
Campaign to display - choose the campaign from the dropdown; please note that only attendee campaigns can be displayed as they are not personalised to an individual;
-
Advanced reporting - only available on Pro subscription; more information on the feature can be found here;
-
Custom code options - select Eventbrite (embedded checkout only);
-
Click Generate code, and the code you need will appear on the right-hand side. Copy this code.
-
-
- Add the share tool code to your Eventbrite integration code.
- Add the code from the previous step to your Eventbrite embed code. It should go immediately before the line beginning “var exampleCallback = …”
- The “Final code” picture at the end of this section highlights the changes to the Evenbrite embed code we made - this may be a useful reference to see where the code should be added.
- Use the function we just added as the callback
-
- Find the third-to-last line in your Eventbrite Embed code (beginning “onOrderComplete: exampleCallback // Method …”
- Replace “exampleCallback” with “insertGleaninFiles”
- This change is also highlighted in the “Final code” picture below.
 Final code, with changes highlighted in red
Once you have completed the edit above, register for your event using the embedded checkout again and confirm it is working as you want.
If you have any feedback on this guide or are are having problems, please get in touch by emailing hello@gleanin.com - if you can include a description of any problems you’re seeing and a link to the page with your embedded checkout that will help us investigate any issues.
Please ensure that you have set up conversion tracking to effectively monitor conversions for your event.
Registration confirmation pages without JavaScript or HTML embed support
If your registration confirmation page lacks support for external JavaScript, pop-ups, or embedded content, you can still effectively promote your attendee campaign by setting up a dedicated webpage. Follow the steps outlined below to achieve this:
-
Go to the Run campaign section in your dashboard and generate the campaign link you want to promote.

-
Build a branded webpage and implement the share tool using instructions from the Standard web page HTML setup (please remember to implement conversion tracking on this page too).
-
On your registration confirmation page, include a "Share Now" button that hyperlinks to the campaign page you created, allowing users to easily promote your event.
Troubleshooting & help
If you have followed all the necessary steps and ensured that the added code matches exactly what was generated on the platform, and if you have included all components of the code implemented solely on the confirmation page but are still encountering issues, please feel free to contact us at hello@gleanin.com.
We will need to inspect that specific page to verify the code, which typically requires going through the registration flow. For free registrations, we will proceed through the flow; however, a discount code for the paid registrations will be necessary.