Overview
Things to consider before setting up
Creating your campaign
Customising your campaign: landing page URL
Customising your campaign: channels & suggested post
Customising your campaign: metadata
Customising your campaign: theme
Running campaign: generating campaign link
Customising campaign: splash & image share screen
Running your campaign: adding the share tool to your registration confirmation page
Running your campaign: conversion tracking
Running your campaign: insights
Overview
Gleanin attendee campaigns enable you to create shareable links designed to encourage your attendees to promote the event with their networks after registering. These campaigns use branded imagery and messaging to make it easy and appealing for attendees to spread the word, helping you boost awareness and drive registrations organically.
This is the ideal setup if you don’t need to include personalised details like company logos or names. It’s a simple, scalable way to generate buzz around your event without requiring individual customisation.
Things to consider before setting up
Attendee campaigns cannot be personalised and do not support the inclusion of images or logos (aside from your own). As such, they are ideal for use on registration confirmation pages—either as a pop-up or embedded element—allowing new registrants to help promote your event.
Although we refer to them in the product as "attendee campaigns," they can be used for any non-personalised campaign that doesn't require personal information. For example, messages like “I’m sponsoring the X event” or “I’m shortlisted for this award” can be created and shared with your sponsors or nominees.
Since attendee campaigns do not use personalised template elements, you have the flexibility to design your own background image and use it as the main template, hiding all Gleanin elements if desired. To learn more about this option, please click here.
Don't worry about the button shown on the Gleanin templates. On LinkedIn and Facebook, the entire image is clickable, so the button serves more as a visual cue rather than a functional element. For other social networks, it's the link in the post that users will click to register.
Creating your campaign
Campaigns are created within an event, and there is no limit on how many you can create.
If you're managing multiple campaigns, such as sponsors, ambassadors or campaigns in different languages, be sure to label each one clearly for easier identification.
For the attendee campaign, you can choose not to use a template with Gleanin elements and just upload already-made images with all the information on them, as done in the video.
Follow these simple steps to create your attendee campaign:
- In the left-hand menu, click Campaigns.
- Click Create my first campaign or the blue plus (+) icon.
- On the next screen, select Attendee as your campaign type.
- On the theme customisation screen, you can upload your branded design assets and edit the colour scheme, as well as choose the background image only option. Don’t worry if you don’t have your final design yet; you can update it later via the Theme section of the campaign dashboard.
- Fill in the required campaign details (these can also be edited later from the dashboard):
- Landing Page URL: The landing page for your event
- Suggested post: Pre-written copy for your stakeholders to share
- Social share metadata: Text that appears when the link is shared
- Campaign language: Choose the display language (note: this does not translate the admin interface or product)
- Click Finish to complete the setup.
Once your campaign is created, you can fine-tune it directly from your dashboard.
Customising your campaign: landing page URL
Your campaign landing page URL is the link you want your attendees to share. It should clearly communicate your event’s value and drive action, whether that’s learning more or registering. Choose a page that’s relevant, engaging, and designed to convert visitors into participants.
Before we dive into the next step, let’s take a moment as well to talk about UTM parameters. These small but powerful URL tags help you track where your campaign traffic is coming from and how it’s performing. Don’t worry if you’re not familiar with them; our UTM builder provides recommended settings you can easily accept and use.
If you need to make any changes to the landing page URL provided during the campaign setup, you can edit your Landing Page URL directly from the landing page section. Please ensure that the updated link works and does not contain any typos.
To apply UTM parameters, simply click Accept recommendations in the URL Health Check to use our suggested UTM settings. If you have your own parameters or need more fields, just click on Add additional custom UTM code.
Customising your campaign: channels & suggested post
As part of your campaign setup, you'll be asked to provide a suggested post, a message your attendees can share to promote your event. This post can be shared across a variety of social and communication channels, including LinkedIn, Facebook, email, BlueSky and many more.
Once your campaign is set up, you can customise the message for each specific channel - the suggested post.
You can easily control which sharing channels your attendees use by toggling them on or off, and rearranging their order on the image sharing screen.
Each channel can have its own customised message, just click the pencil icon to edit the text. For channels that include in the copy, make sure not to remove it, as it's required for the post to include the campaign link.
Due to LinkedIn updates, there are now a few additional steps to set up, and you can explore these options in more detail here, but sticking with the default auto-post setting is a safe choice.
To enable Instagram Story templates, please see here.
Customising your campaign: metadata
Metadata for social share images refers to the information embedded in a webpage's content that helps control how the page is displayed when shared on social media platforms. This includes the image, title, description, and other details that help platforms like Facebook, Twitter, LinkedIn, etc., generate rich previews of the content being shared.
For example, when someone shares your event on Facebook, the title and description of the image that appear in the post are pulled from the metadata. It’s important to edit these elements to ensure they are on-brand and tailored specifically to your event.
You can customise your metadata text in the Metadata section of the dashboard.
Here are some best practices to keep in mind:
-
Title: Use this space to share the key message you want your exhibitors to promote, e.g. “I’m exhibiting at [Event Title] – join me!”. Keep it concise - there’s a 65-character limit.
-
Description: Include a clear call to action for the audience, such as “Register now” or “Sign up today”. The character limit here is 155.
Note: The product preview on the right is for illustration only. If you choose LinkedIn curated sharing, metadata may not appear.
Alt text is optional. Use it carefully, as incorrect or irrelevant alt text can reduce accessibility rather than improve it. More guidance and information on the alt text can be found here.
Customising your campaign: theme
For attendee campaigns, you have the option to fully design your own background images outside of Gleanin and upload them as the main template, without using any Gleanin elements.
Even if you choose not to customise any Gleanin components, we will still generate templates for you in multiple formats: landscape, portrait (Instagram 4:5), and story (9:16). Alternatively, so you can provide your own fully branded images for each format.
You can also include multiple themes within a single campaign, giving you the flexibility to offer different styles tailored to various audiences.
Editing theme
You can add as many themes as you like to your campaign to give your attendees a broader choice of visuals.
If you’d like to design a theme from scratch, note that there is no reset option. Instead, simply create a new theme from the dashboard and delete the one you no longer need. At least one theme must be active at all times.
More information on managing themes can be found here.
A few things to remember about Instagram:
- Portrait templates will only appear when Instagram is selected as the sharing platform.
- You will need to enable Instagram Stories templates through the channels section, as these are not created by default.
- The content positioning within the portrait templates is adjusted to ensure it displays correctly in Instagram's 3:4 preview format, avoiding any cut-off.
Please note that the attendee campaign does not include the template editor available in speaker and exhibitor campaigns. This is because you have the option to upload a fully designed custom background, eliminating the need to position elements within the template.
As mentioned earlier, there's no need to worry about the button shown on the Gleanin templates. On LinkedIn and Facebook, the entire image is clickable, so the button is purely a visual prompt. On other social networks, users will click the registration link in the post itself.
Running campaign: generating campaign link
For attendee campaigns, no data upload is required. Once your image templates have been added, you can generate a share tool link that allows attendees to start promoting their participation and your event.
This link can be copied directly from the platform and pasted into your campaign emails, CRM, or other marketing channels.
You’ll have two link options:
-
Splash Screen Link – directs users to a landing page where you can provide more event details and instructions.
-
Direct Share Link – takes users straight to the share image screen.
Please note: If you’re adding the attendee campaign to your registration confirmation page, only the direct share screen can be used. The splash screen is not compatible with this method.
To access these links, simply click the Run Campaign button on your campaign dashboard.
To see exactly what your attendees will experience, simply open the attendee campaign link. Reporting only begins when they click the Open social media button, so previewing their links won’t affect the analytics.
In the next two sections, we’ll return to campaign customisation for the splash and share image screens, now that you’ve seen where they appear and how they function.
Customising campaign: splash & image share screen
The share tool link generated on your attendee campaign consist of two screens:
-
Splash Screen: This is where you can add your branding and encourage attendees to take action.
-
Share Images Screen: Here, they can select an image and choose which social channel to share it on; note that this is the screen that your attendees will see on the registration confirmation page share tool.
Splash screen
You can customise your splash screen directly from the dashboard.
-
Change the wording to better encourage your exhibitors to share.
-
Choose the background colour to align with your brand.
-
Add a splash image that includes your event details.
More information and best practices on using the splash screen can be found here.
Share images screen
In the Share Image tab, you can edit the text that attendees will see before sharing their images with their networks.
You can adjust the text to reflect the number of templates available for sharing in the campaign. For instance, if there are two templates to choose from, you could modify the text to say "Share your images" instead of "Share your image."
The preview in this section is for illustration purposes only. To see how your attendee link will actually appear, use the preview option in the Run campaign section.
Running your campaign: adding an advocacy tool to your registration confirmation page
Once you've set up and customised your attendee campaign, you can add the attendee sharing tool to your registration pages to encourage registrants to share their attendance with their network and help amplify your event's reach.
Adding the advocacy tool to your pages does not require any integrations; it simply involves inserting a small snippet of code into your page. Most registration pages use a standard HTML setup, but we also provide custom code for certain providers. Please refer to the specific instructions in this article for more details.
Alternatively, you can share a direct link to the advocacy tool in your registration confirmation emails or any other pre-event communications. You can find more information on how to do that here.
Running your campaign: conversion tracking
In addition to adding UTM parameters to your landing page, you can track conversions in Gleanin by adding our conversion tracking script to your desired conversion or landing page URL. The most common page to track is the registration confirmation page, but you can choose any page where you want to monitor conversions.
Conversion tracking code needs to be generated for both your event marketing pages and the confirmation page. These will be two separate code snippets, which you can generate in your Gleanin account.
The Web Tracking Code is for your event marketing and registration pages. This snippet should be added to all of those pages.
The Confirmation Page Code is specifically for the confirmation page and needs to be added by your registration provider.
In the example, we’ve demonstrated the code generation process for the standard HTML setup. For more customised setups and provider-specific instructions, please refer to this article.
You can check if conversion tracking is set up and functioning correctly by looking at the indicator on your campaign dashboard.
-
Red: The code hasn’t been detected on your pages.
-
Amber: The code is present, but no conversions have been recorded.
-
Green: Conversions are being tracked for this campaign.

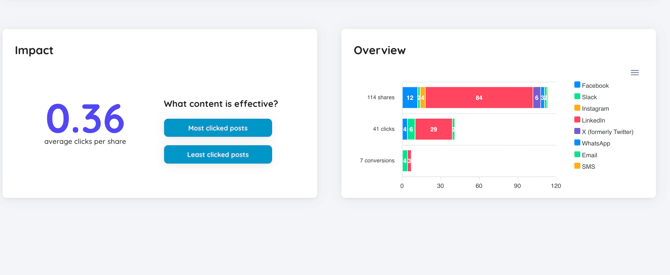
Running your campaign: insights
Gleanin's insights pages are specifically designed to help you pinpoint the key factors that contribute to your success. By identifying these drivers, you can enhance your performance by increasing the number of shares, clicks, and ultimately, attendees.
The attendee campaign insights page has two categories
-
Impact: Identify your most influential advocates by tracking who receives the highest number of clicks. This also helps you determine which templates are driving the most clicks, so you can refine your creative strategies for future campaigns.
- Overview: breakdown of the number of shares, clicks and conversions by the sharing channel.
To learn more about these categories and how to act on the results, please refer to the article here.
If you are a Pro customer or want to learn more about Advanced reporting on your attendee campaigns and how to track the ID of attendees, you can find the setup and general information here.